Posts tagged ‘Dryer Sheets’
What to do with Dryer Sheets
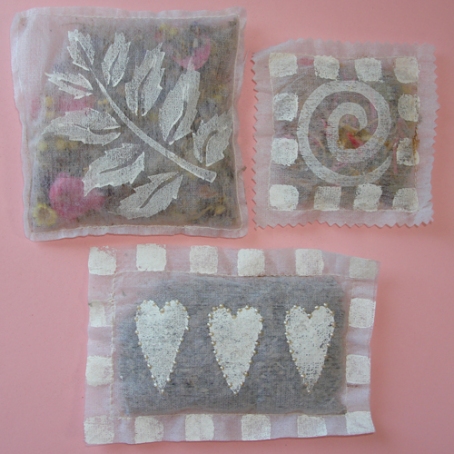
 LOS OSOS, CA – Monday morning – Dryer sheet sachets have to be one of my top ten favorite designs! I actually made these sachets years ago for the Aleene’s Creative Living television show. (And yes, these were tucked away in storage in ‘the Shed’). I have made many since these originals, as they make a great gift for just pennies, and you get great comments.
I love the delicate look these have. By using the dryer sheets and the white paint they kind of have a lacey look. AND they are recycling (or is this upcycling?) something that normally gets thrown away. (That is if you can find them in dryer – usually stuck to the sheets and towels!) So, start saving your used dryer sheets or if you want to make some right away… grab some right from the box. Either way you’ll make a great creative project. Creatively yours…. Heidi
DRYER SHEET SACHETS
by Heidi Borchers for http://www.inspiredathome.com
Materials
Dryer Sheets (You can use new or ‘used’ dryer sheets. If they are wrinkled, iron flat with low to medium heat on iron. Test first as some dryer sheets tend to melt from hear of the iron. If this happens, iron dryer sheet in between two thicknesses of paper towels.)
Acrylic paint – white
Sewing machine (If you don’t sew, you can glue with Aleene’s® Fast Grab Tacky Glue®)
Craft foam – any color
Foamboard
Aleene’s® FunCraft™ Foam Glue
Tulip 3D Dimensional Paint – Liquid Pearl
Brush – ½” wide flat
Lavender flowers, potpourri or aromatic herbs
Waxed paper (to protect work surface)
Iron
Scissors (and craft knife for foam board)
Paper towels
Wet wipes
Instructions:
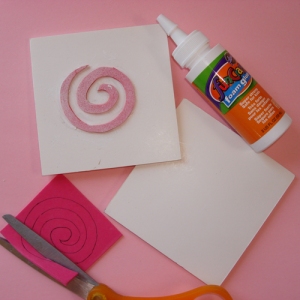
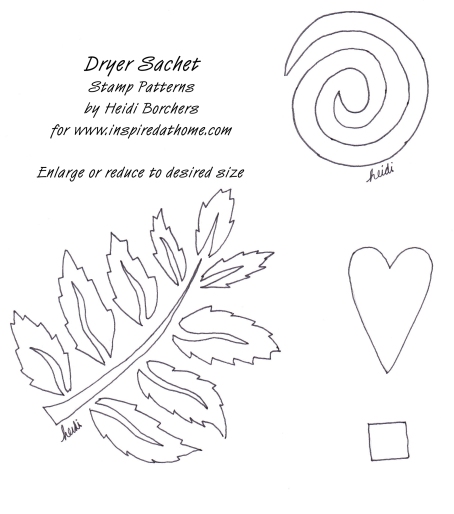
Transfer patterns (see below) to craft foam and cut out. Cut foamboard slightly larger than designs. Glue craft foam design to foamboard using Aleene’s® FunCraft™ Foam Glue. Let glue dry.
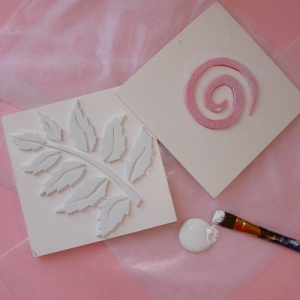
To stamp designs, place prepared dryer sheet onto waxed paper on a flat surface. Plan placement of your design so you can make use of the entire dryer sheet, making sure you have enough space around design to stitch on the sewing machine. Carefully and quickly, brush an even coat of acrylic paint onto foam design. Immediately while paint is still wet, press onto  dryer sheet and lift. Wipe paint from stamp with wet wipe or damp paper towel. Let paint dry. On the heart design, I placed dots of Tulip paint along edge of hearts. Let dimensional paint dry.
SEW TOGETHER
When paint is dry, place a piece of dryer sheet (same size as painted one) to back of painted one and stitch three sides. Fill with potpourri, lavender or your choice of herbs. Stitch remaining side closed. Clip off any threads. If necessary, trim edges with scissors or pinking shears.
-OR- GLUE TOGETHER
If gluing edges together, place a thin line of the Aleene’s® Fast Grab Tacky Glue® onto three sides of a plain sheet of the dryer sheet. Place painted side up in the glue. Let glue dry. Fill with potpourri or lavender. Carefully glue remaining side closed. Let glue dry. Trim edges as above.
Heidi’s Designer Tip: I always test the stamp design first. Just apply the paint as instructed and then stamp onto clean piece of paper or waxed paper. This will help to give you an idea of just how much paint to use and how much pressure to put on the stamp. Then to ahead and stamp the dryer sheet!


Recent Comments