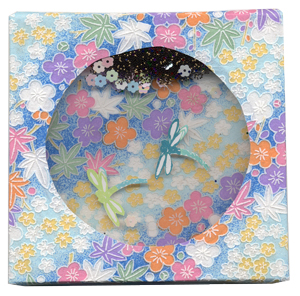
Dragonfly Shaker Card
July 13, 2009 at 2:20 pm Tiffany 1 comment

GRASONVILLE, MD – Monday afternoon – In last night’s Inspired at Home Radio Show “After the Show” segment, we were taking phone call questions from radio listeners and chatting about matboard and foamboard with Eileen Hull, author of “Matboard Magic” and “Foamboard Magic”.
Maria Nerius called in to the show to join in the conversation and shared with us her idea for a Dragonfly Shaker Card.
As promised, here’s a photo and instructions. Thanks Maria!
Dragonfly Shaker Card
by Maria Nerius
Materials
- Decorative paper or cardstock
- Scissors or craft knife
- Metal ruler
- Craft plastic, acetate or page protector
- Thick craft foam, cardboard or foamboard
- Paper glue
- Shaker stuff: confetti, small paper punched shapes
- Optional: mat cutter (oval or circle)
Step-by-Step
- There is more than one way to make a shaker box or card. And you can buy shaker box kits or pre-done pieces. This is a way to make one from scratch.
- There are 4 pieces to a shaker box: The front, the window craft plastic (or acetate or page protector), the thick frame and the backing.
- Decide on the design of your shaker box. For beginners, a simple square is best. But keep in mind you can use a square with a circle window or even cut out a shape for your shaker box. Let’s start with a square with a square window. The measurements will be 4” x 4” with a 3” x 3” window centered in the middle.
- Cut the front, the plastic, the frame and the backing. All will be 4” x 4”.
- Cut a window for the front and the frame. The window for the front should be slightly smaller that the window in the frame.
- Adhere the backing to the frame. Backing can be simple plain cardstock. Or if you want a decorative paper to show through the window, make sure you glue the right side showing through the window.
- Adhere the plastic to the front. Make sure you get a good seal all the way around the window.
- Add your shaker confetti into the frame.
- Adhere the front to the frame. You might want to put a heavy book on top for a few hours to get the best seal.
- Shake, shake, shake! Shaker cards are fun as card fronts, accents on a scrapbooking page, embellishment of an altered book, or as part of a collage. You can increase or decrease the size and proportion to fit any need!
Entry filed under: Crafty Things, Maria Nerius. Tags: dragonfly, Eileen Hull, foamboard, Foamboard Magic, Inspired at Home, Maria Nerius, Matboard Magic, shaker card.

1. Eileen | July 14, 2009 at 1:53 pm
Maria, you have inspired me! Thanks for the great design. Check out http://www.eilleenhull.blogspot.com for a special card just for you!